# Creating a Permission
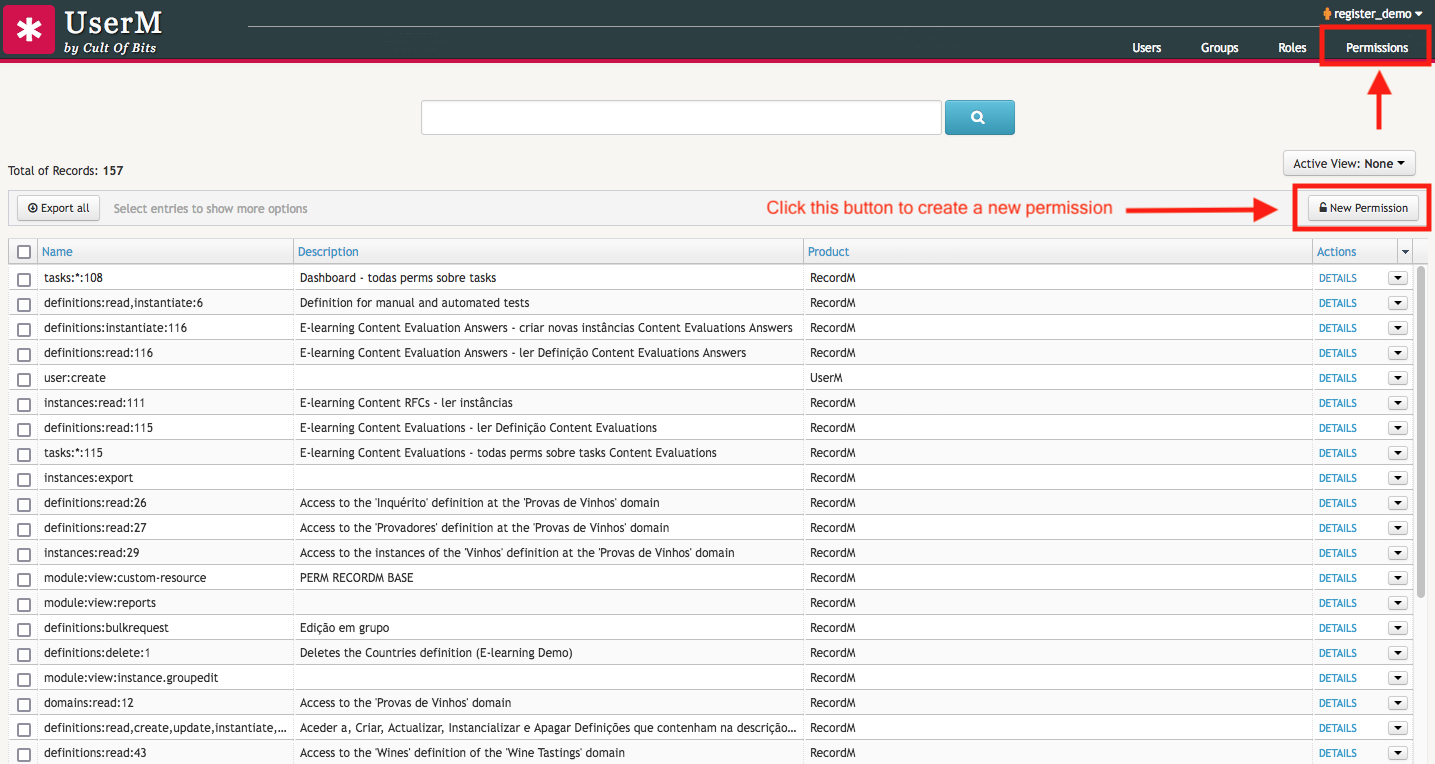
In the image below it is possible to see a listing of all the permissions accessible in a CoB server for the user register_demo. Each permission entry includes its given name, a description, and the name of the CoB product it is aimed at. To create a new permission, just click on the New Permission button located on top right corner of the permissions listing.

After clicking the button, enter the Name of the permission you wish to create. As already mentioned, for the permission to work correctly, its name must follow the schema scope:action:id. The red asterisk - * - next to the input box tells us that the filling of this field is mandatory. Below it, there is a Product field for selecting the name of the CoB module for which you want to build a permission. Here is a brief explanation of each module:
- DeviceM - device management;
- RecordM - information management;
- Elasticsearch - search-related tasks;
- UserM - user management;
- IntegrationM - integration-related tasks.
WARNING
Please be aware of the product you select for your newly created permission. If you happen to assign a product to a permission which is not supported by that product, the permission is not going to work as expected. For instance, if you create the permission group:read:1, the product you select must be UserM and not RecordM.
There is also an optional Description field, in case you want to include a note about the aim of the group.
TIP
You can test if the permission works as expect for a given user with a particular instance or definition. In the Test section of the page, enter the username of the user account you wish to test in the User to impersonate field and the id of that data entity in the Entity to test field. After inserting the required data, click on the Test button. A JSON-formatted piece of code with the result of that test will be automatically generated.
When you are done, click the Save button.

Later on, you chan check and edit the data about the permission by clicking on the DETAILS link located the rightmost cell of the permission entry:

Once in the details page of the selected permission, you can get information about it such as its name, product for which it is aimed at, description and a link to a search query for roles with this permission:

TIP
From the details page of the selected permission it is also possible to test it whenever the need arises.
After clicking on the link, you will be immediately sent to the following page:

From the details page of the selected permission it is also possible to test it whenever the need arises.
Here is a brief video showing how to create a permission within the CoB platform:
