Drag & Drop
The Dashboard supports a powerful drag-and-drop feature that enhances user interactivity and flexibility in organizing dashboard elements. This documentation provides an overview of how to use this feature and customize its behavior. It is also assumed that the user has read the Admin chapter, specifically the topic on creating and configuring Dashboards.
Overview
The drag-and-drop functionality allows users to move elements around the dashboard by dragging and dropping them into designated areas. This is achieved using two main CSS classes:
dragItem: This class is assigned to HTML elements that can be dragged.dropZone: This class is assigned to HTML elements that act as drop targets fordragItems.
How to Use Drag and Drop
To enable an element to be draggable, simply assign it the dragItem class. Similarly, to designate an element as a drop target, assign it the dropZone class. The elements can also have data attributes and specific classes to pass parameters when an item is dropped.
Example:
<div class="dragItem dragItemValue1-{{value1}} dragItemValue2-{{value2}}" data-val1="{{val1}}" data-val2="{{val2}}">
    ...dragItem content...
</div>

<div class="dropZone dropZoneId-{{id}} dropZoneState-{{state}}" data-rmID="{{id}}" data-state="{{state}}">
    ...dropZone content...
</div>
A very basic example
On the following example we have a dashboard with 2 ways that we can use drag and drop functionalities. The first ROW contains 3 Boards, each with 1 Menu. For each Menu, we iterate over a list of items (in this case they're just numbers). The goal is to enable drag and drop between all the Menus.
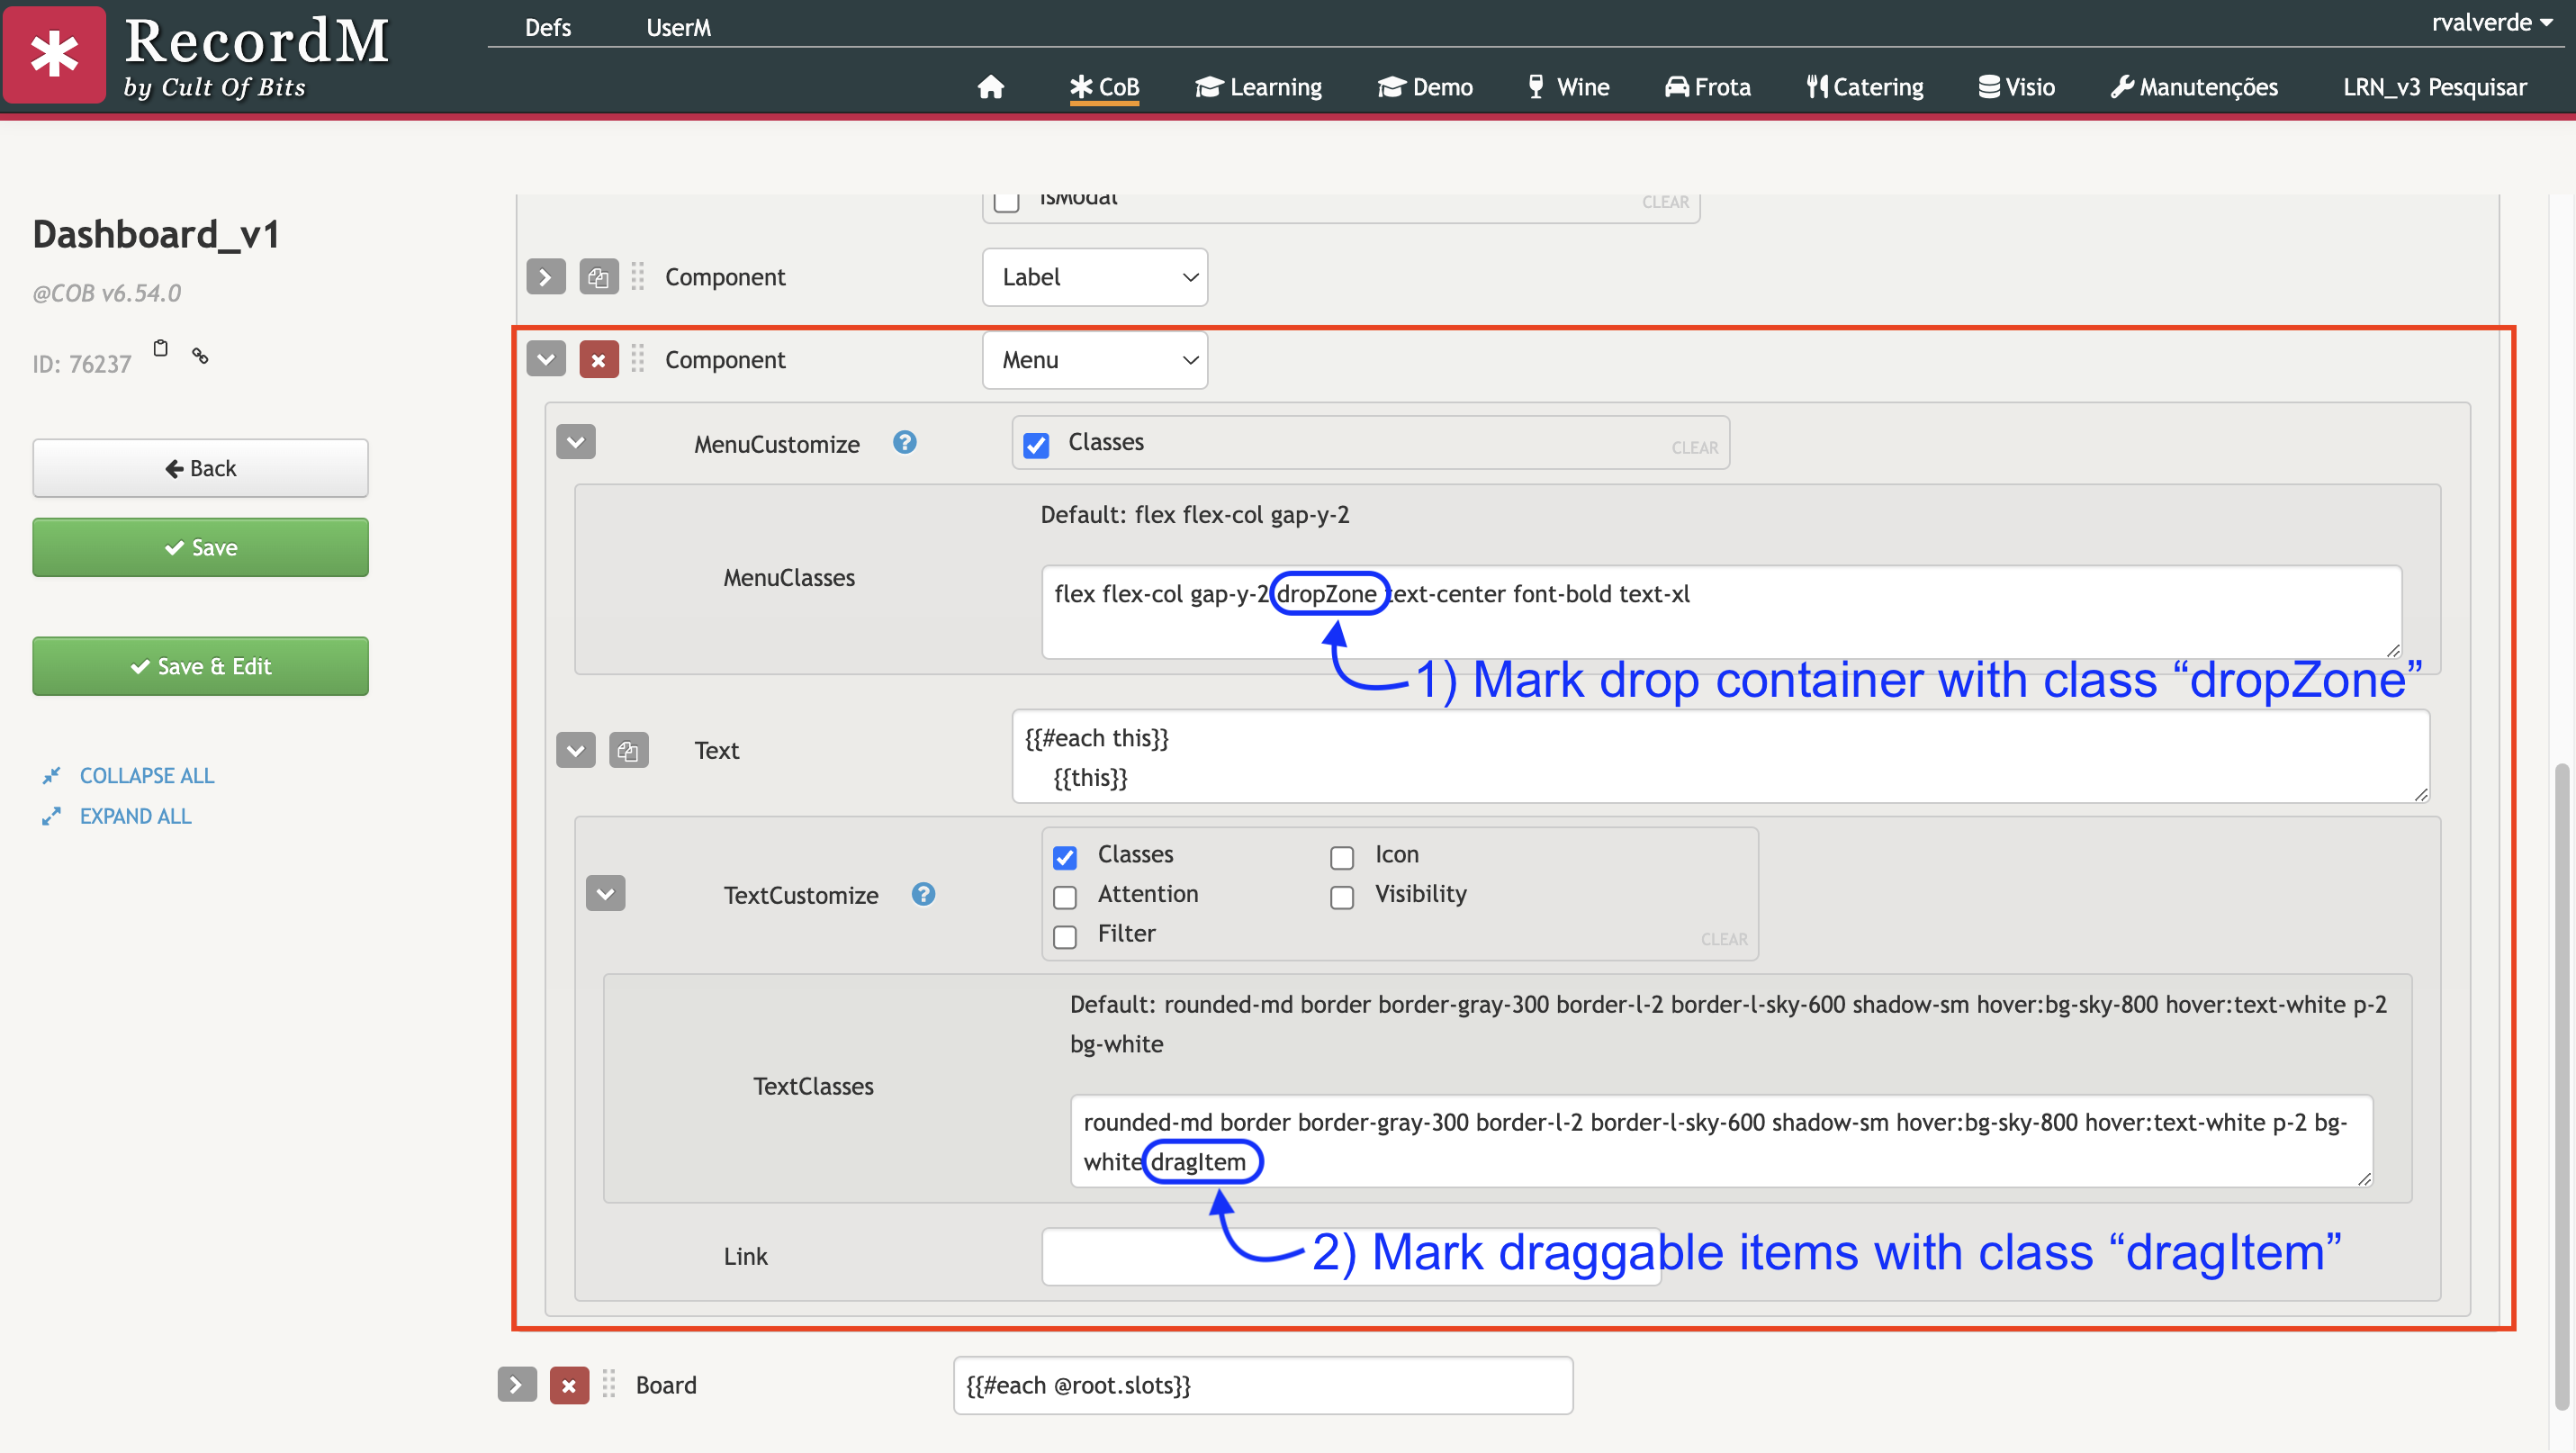
To do this, we must mark each Menu as a dropZone (a container) and each menu item/row as a dragItem (so we can drag items between Menus).
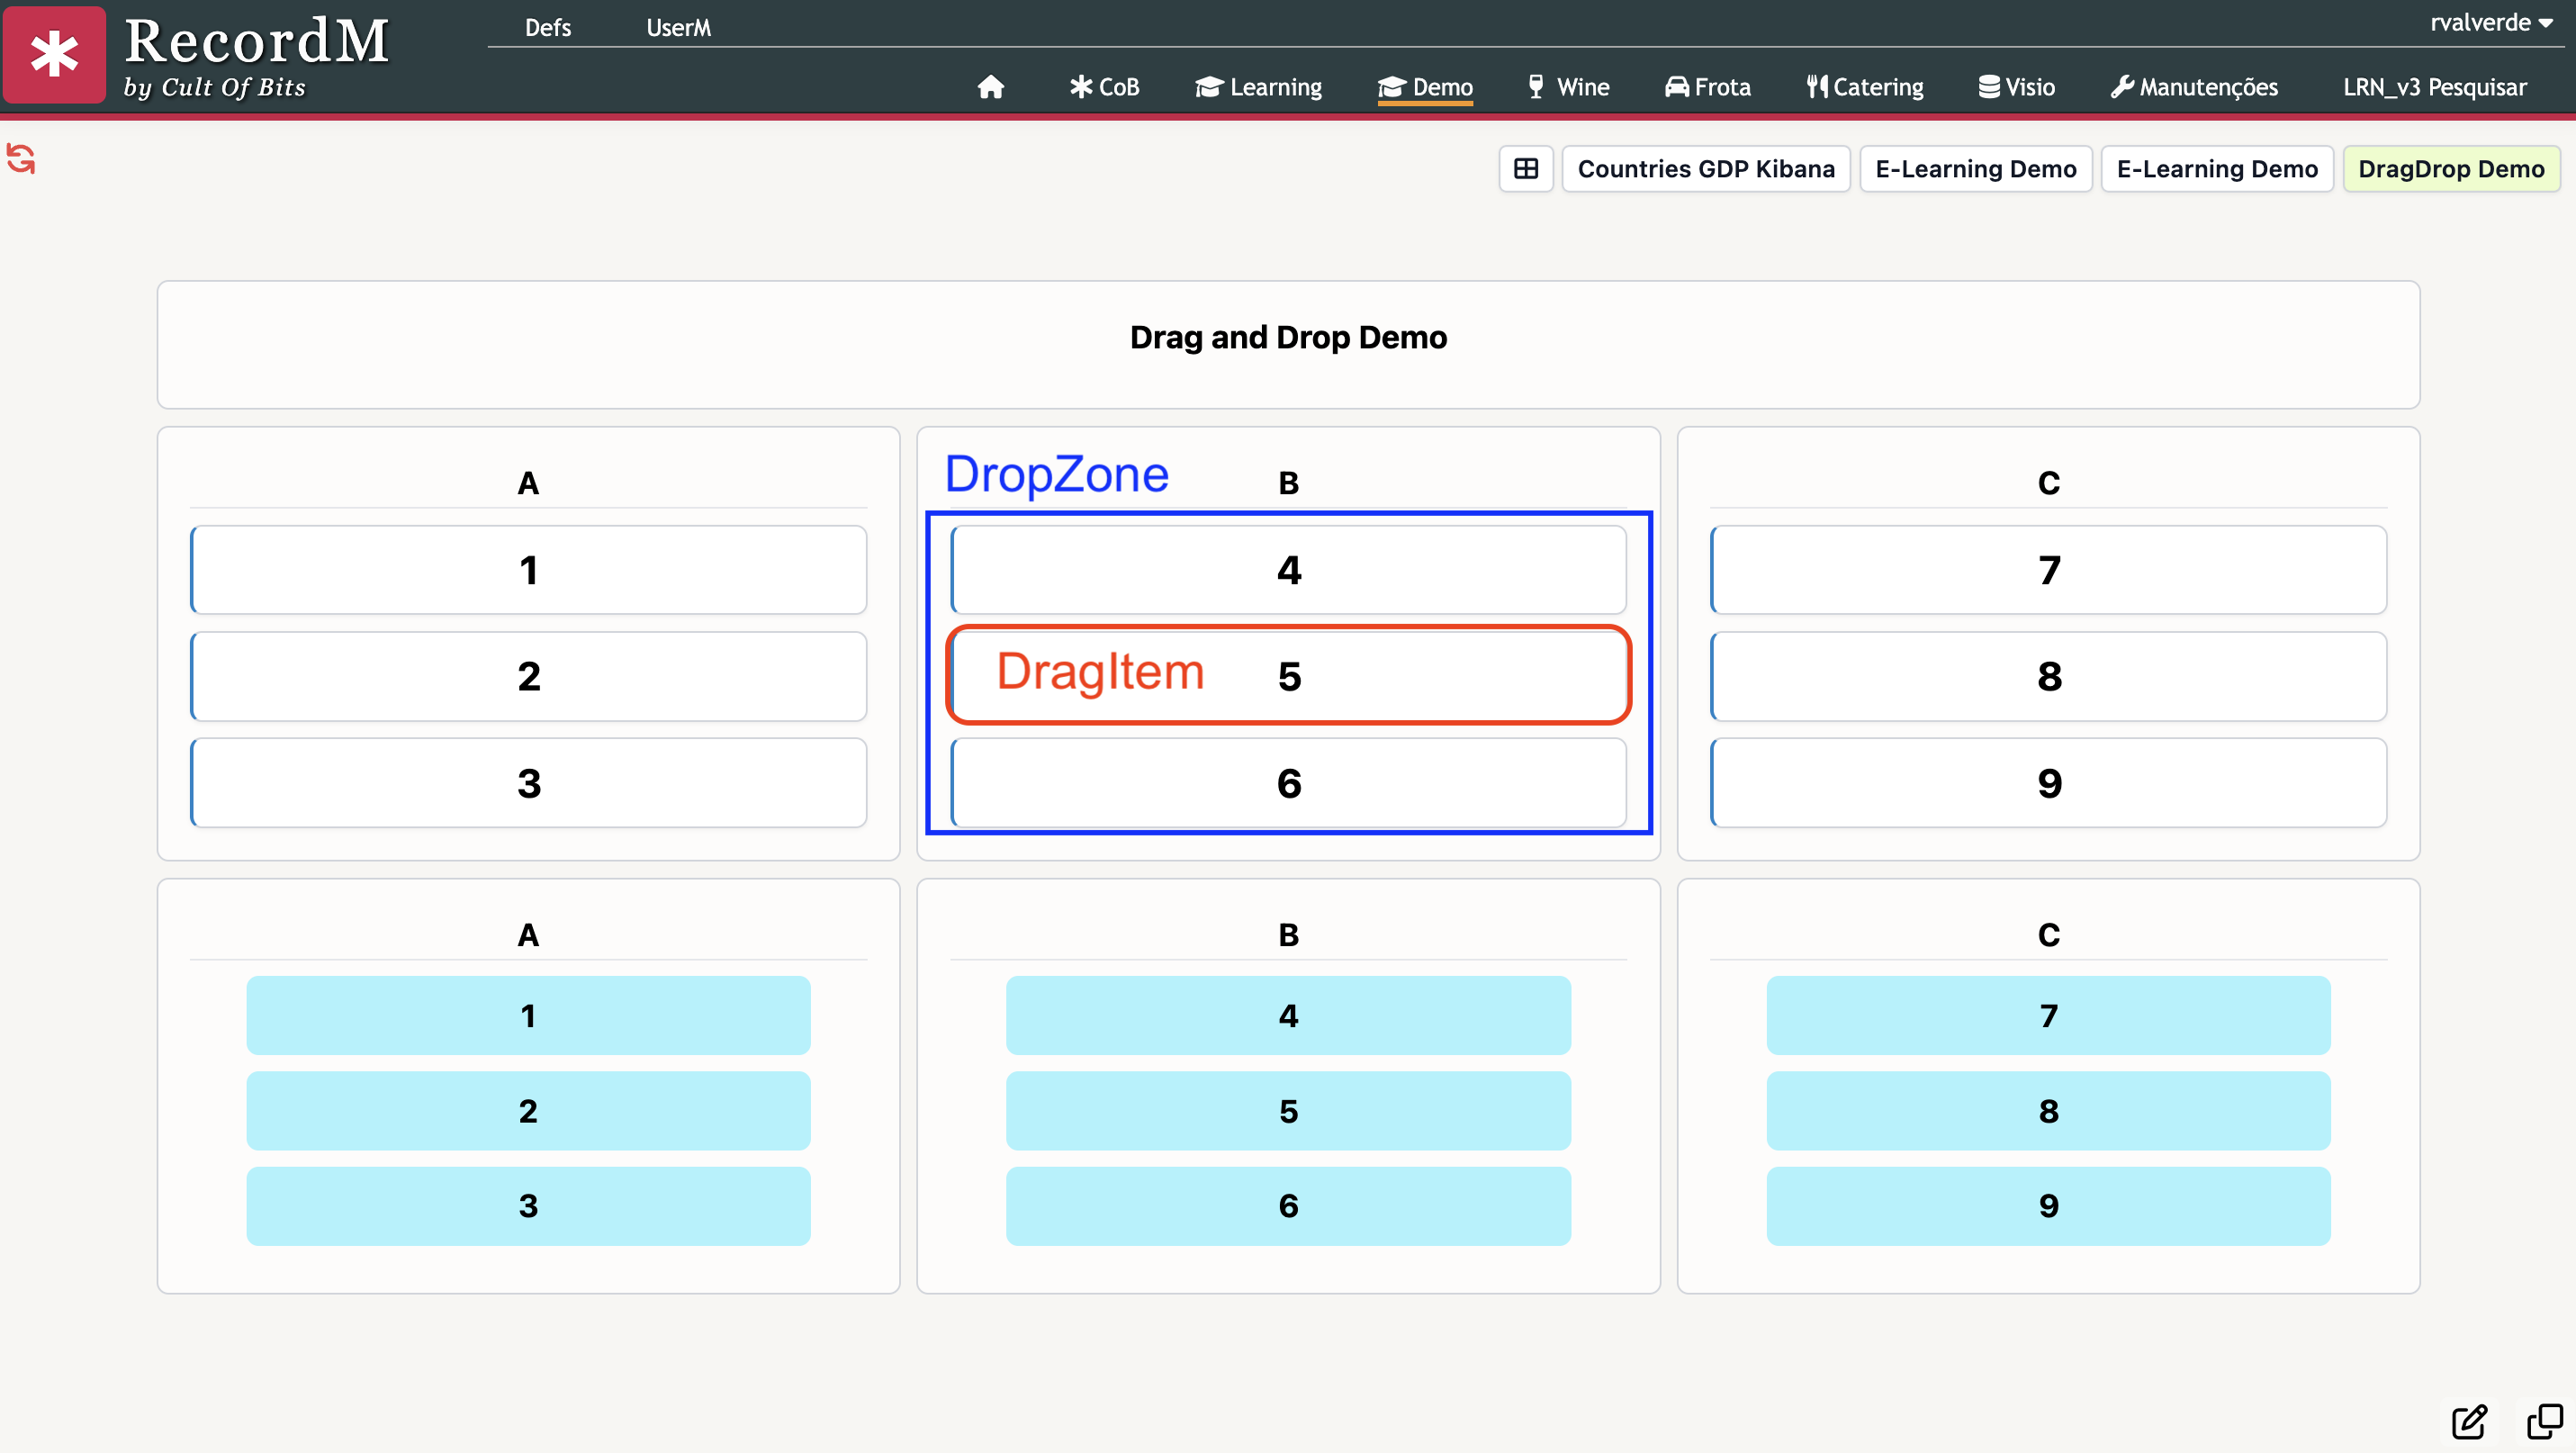
To do this, we place dropZone in our Menus' classes, and dragItem in each Texts' classes, as seen below. Note that we are dynamically iterating a list using Handlebars to render each Menu, and their respective items.
Customizing Drag and Drop Behavior
The Dashboard supports customization of the drag-and-drop behavior using a concurrent script. This script is triggered each time a dragItem is dropped into a dropZone.
Configuration:
- Property:
DragDropConcurrent - Location: DashboardCustomize settings
You can define a concurrent script in the DashboardCustomize settings using the DragDropConcurrent property. This script will be executed automatically when a draggable item is dropped inside a drop zone.
Data Parsing for Concurrent Scripts
When a dragItem is dropped into a dropZone, the concurrent script receives a set of parameters extracted from both the dragItem and dropZone. These parameters are parsed from data attributes (data-*) OR classes prefixed with dragItem and dropZone.
Example Parameters: Given the following elements:
<div class="dragItem dragItemValue1-{{value1}} dragItemValue2-{{value2}}" data-val1="{{val1}}" data-val2="{{val2}}">
    ...dragItem content...
</div>

<div class="dropZone dropZoneId-{{id}} dropZoneState-{{state}}" data-rmID="{{id}}" data-state="{{state}}">
    ...dropZone content...
</div>
The parameters passed to the concurrent script will be:
{
  // DragItem parameters
  "Value1": "value1",
  "Value2": "value2",
  "val1": "val1",
  "val2": "val2",

  // DropZone parameters
  "Id": "id",
  "State": "state",
  "rmID": "id",
  "state": "state"
}
Extra customization options
dragItemOverrideOrigin
By default, the drag&drop engine only supports calling concurrent scripts when dropping on different origin - that is, only when a dragItem is dropped on a different dropZone from where it originated.
To change this behavior, we can add the keyword dragItemOverrideOrigin to our dragItems. This will make the drag&drop engine call the helper concurrent script if the dragItem is dropped on its origin dropZone.
dropZoneHighlight
The keyword dropZoneHighlight is used to enable highlighting of the dropZone when dropping and hovering a dragItem. It also disables enriching the context with the previous and next html elements.
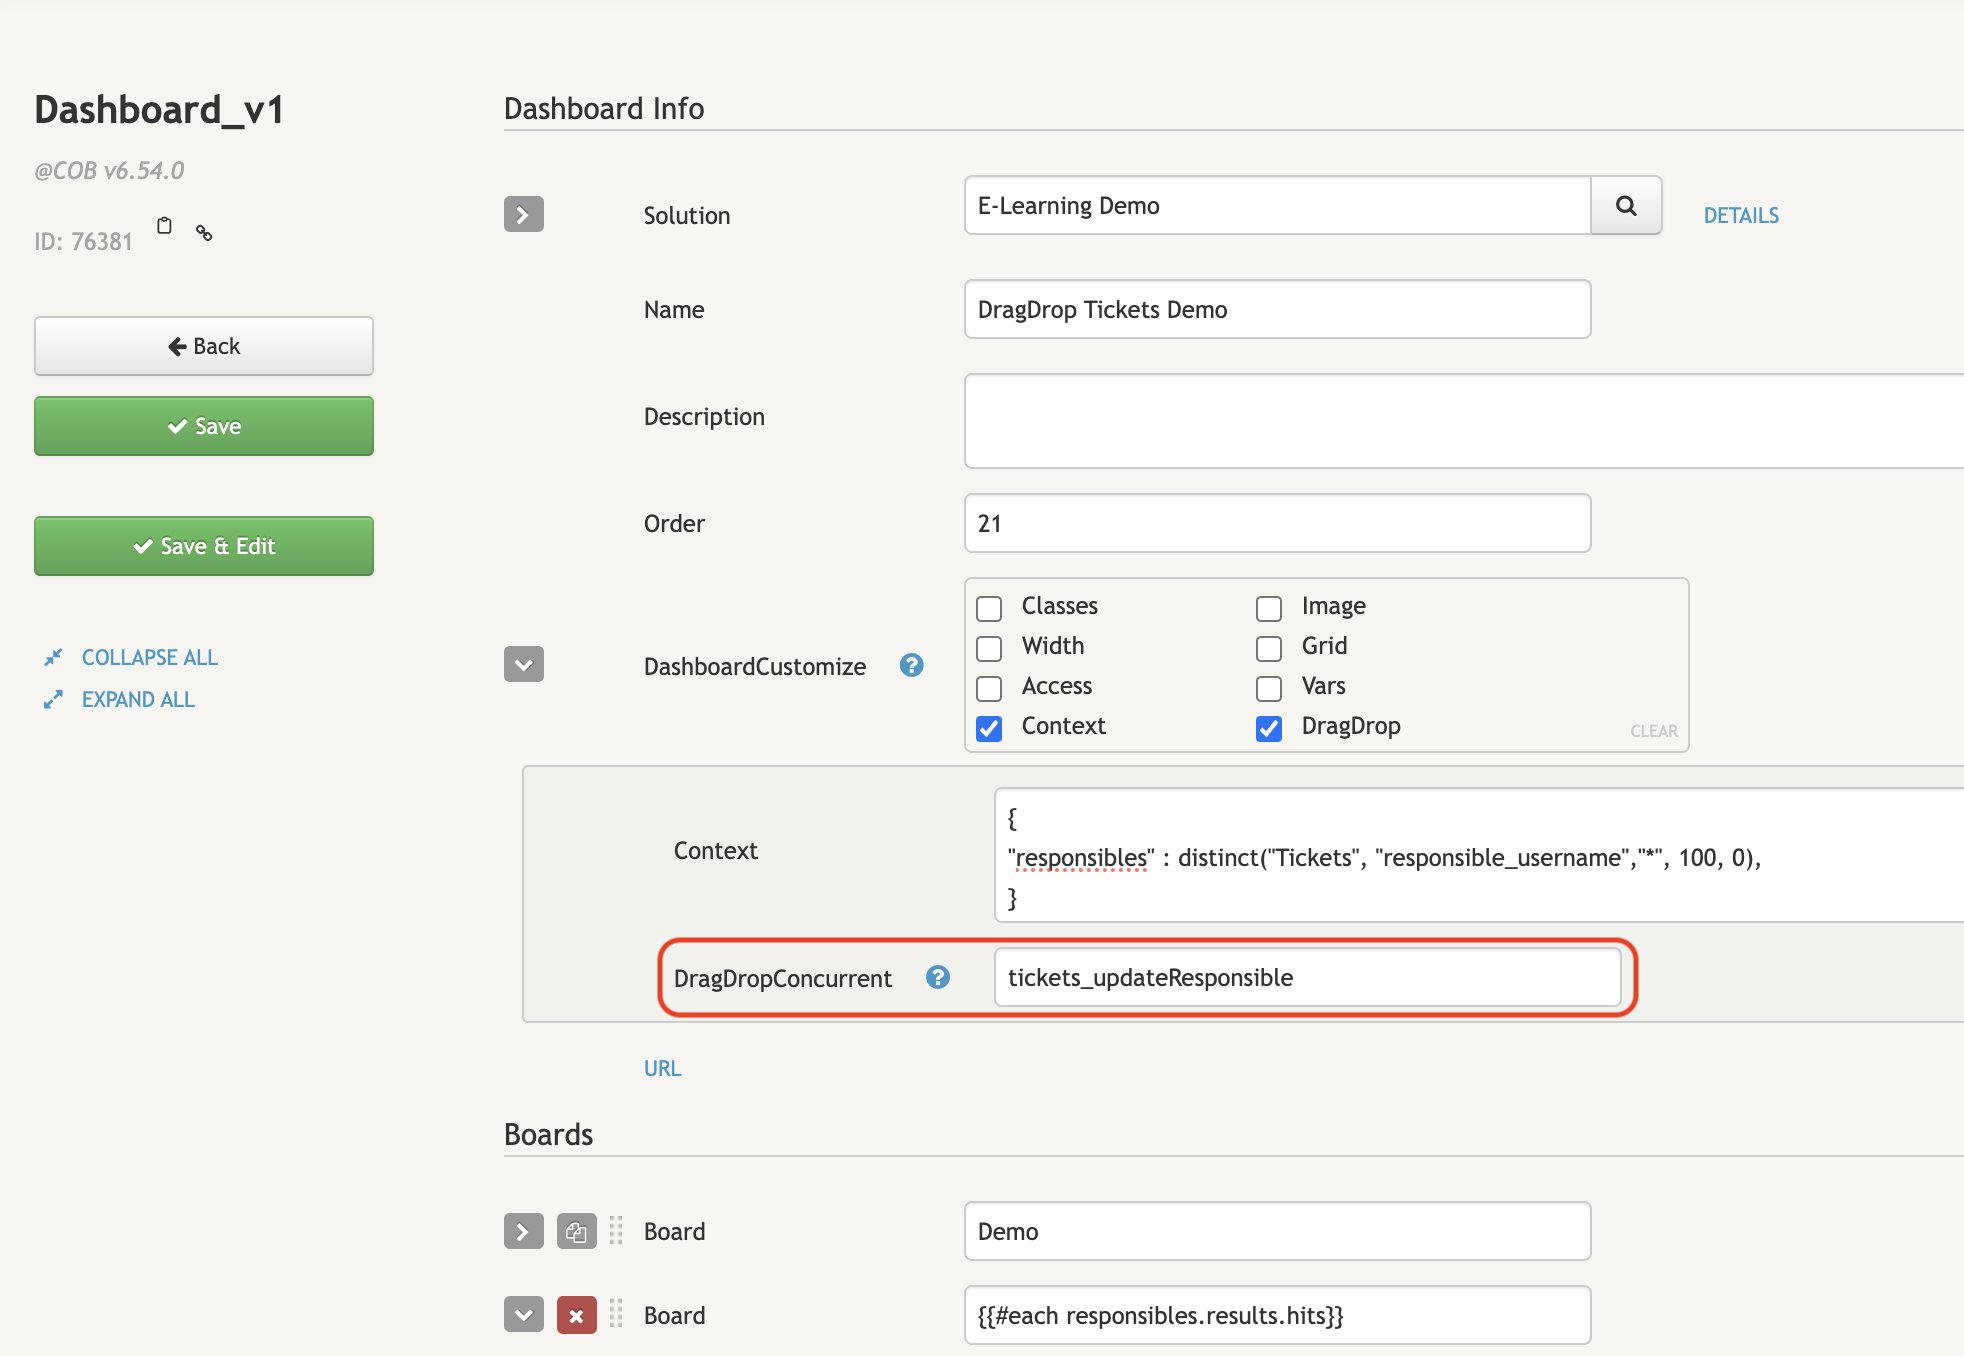
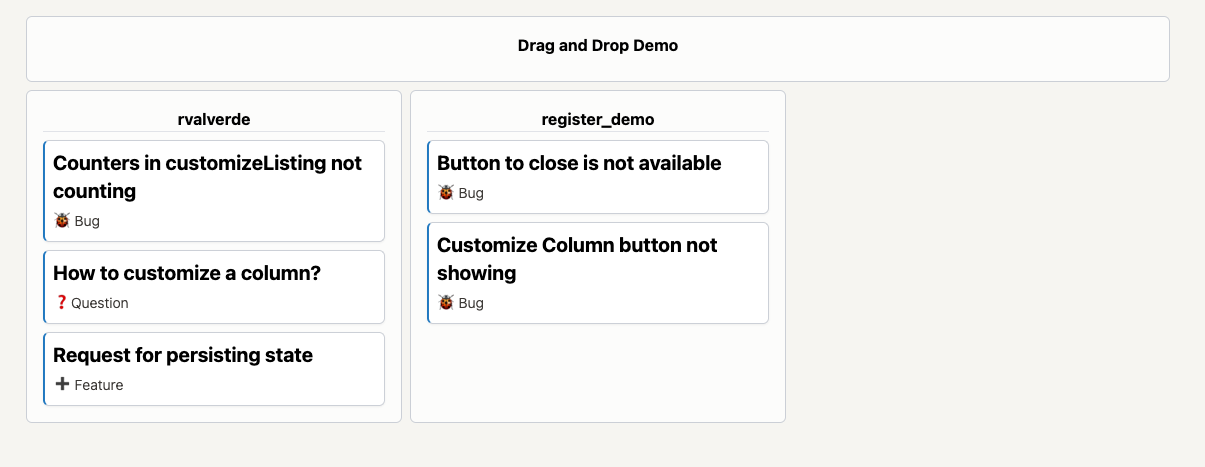
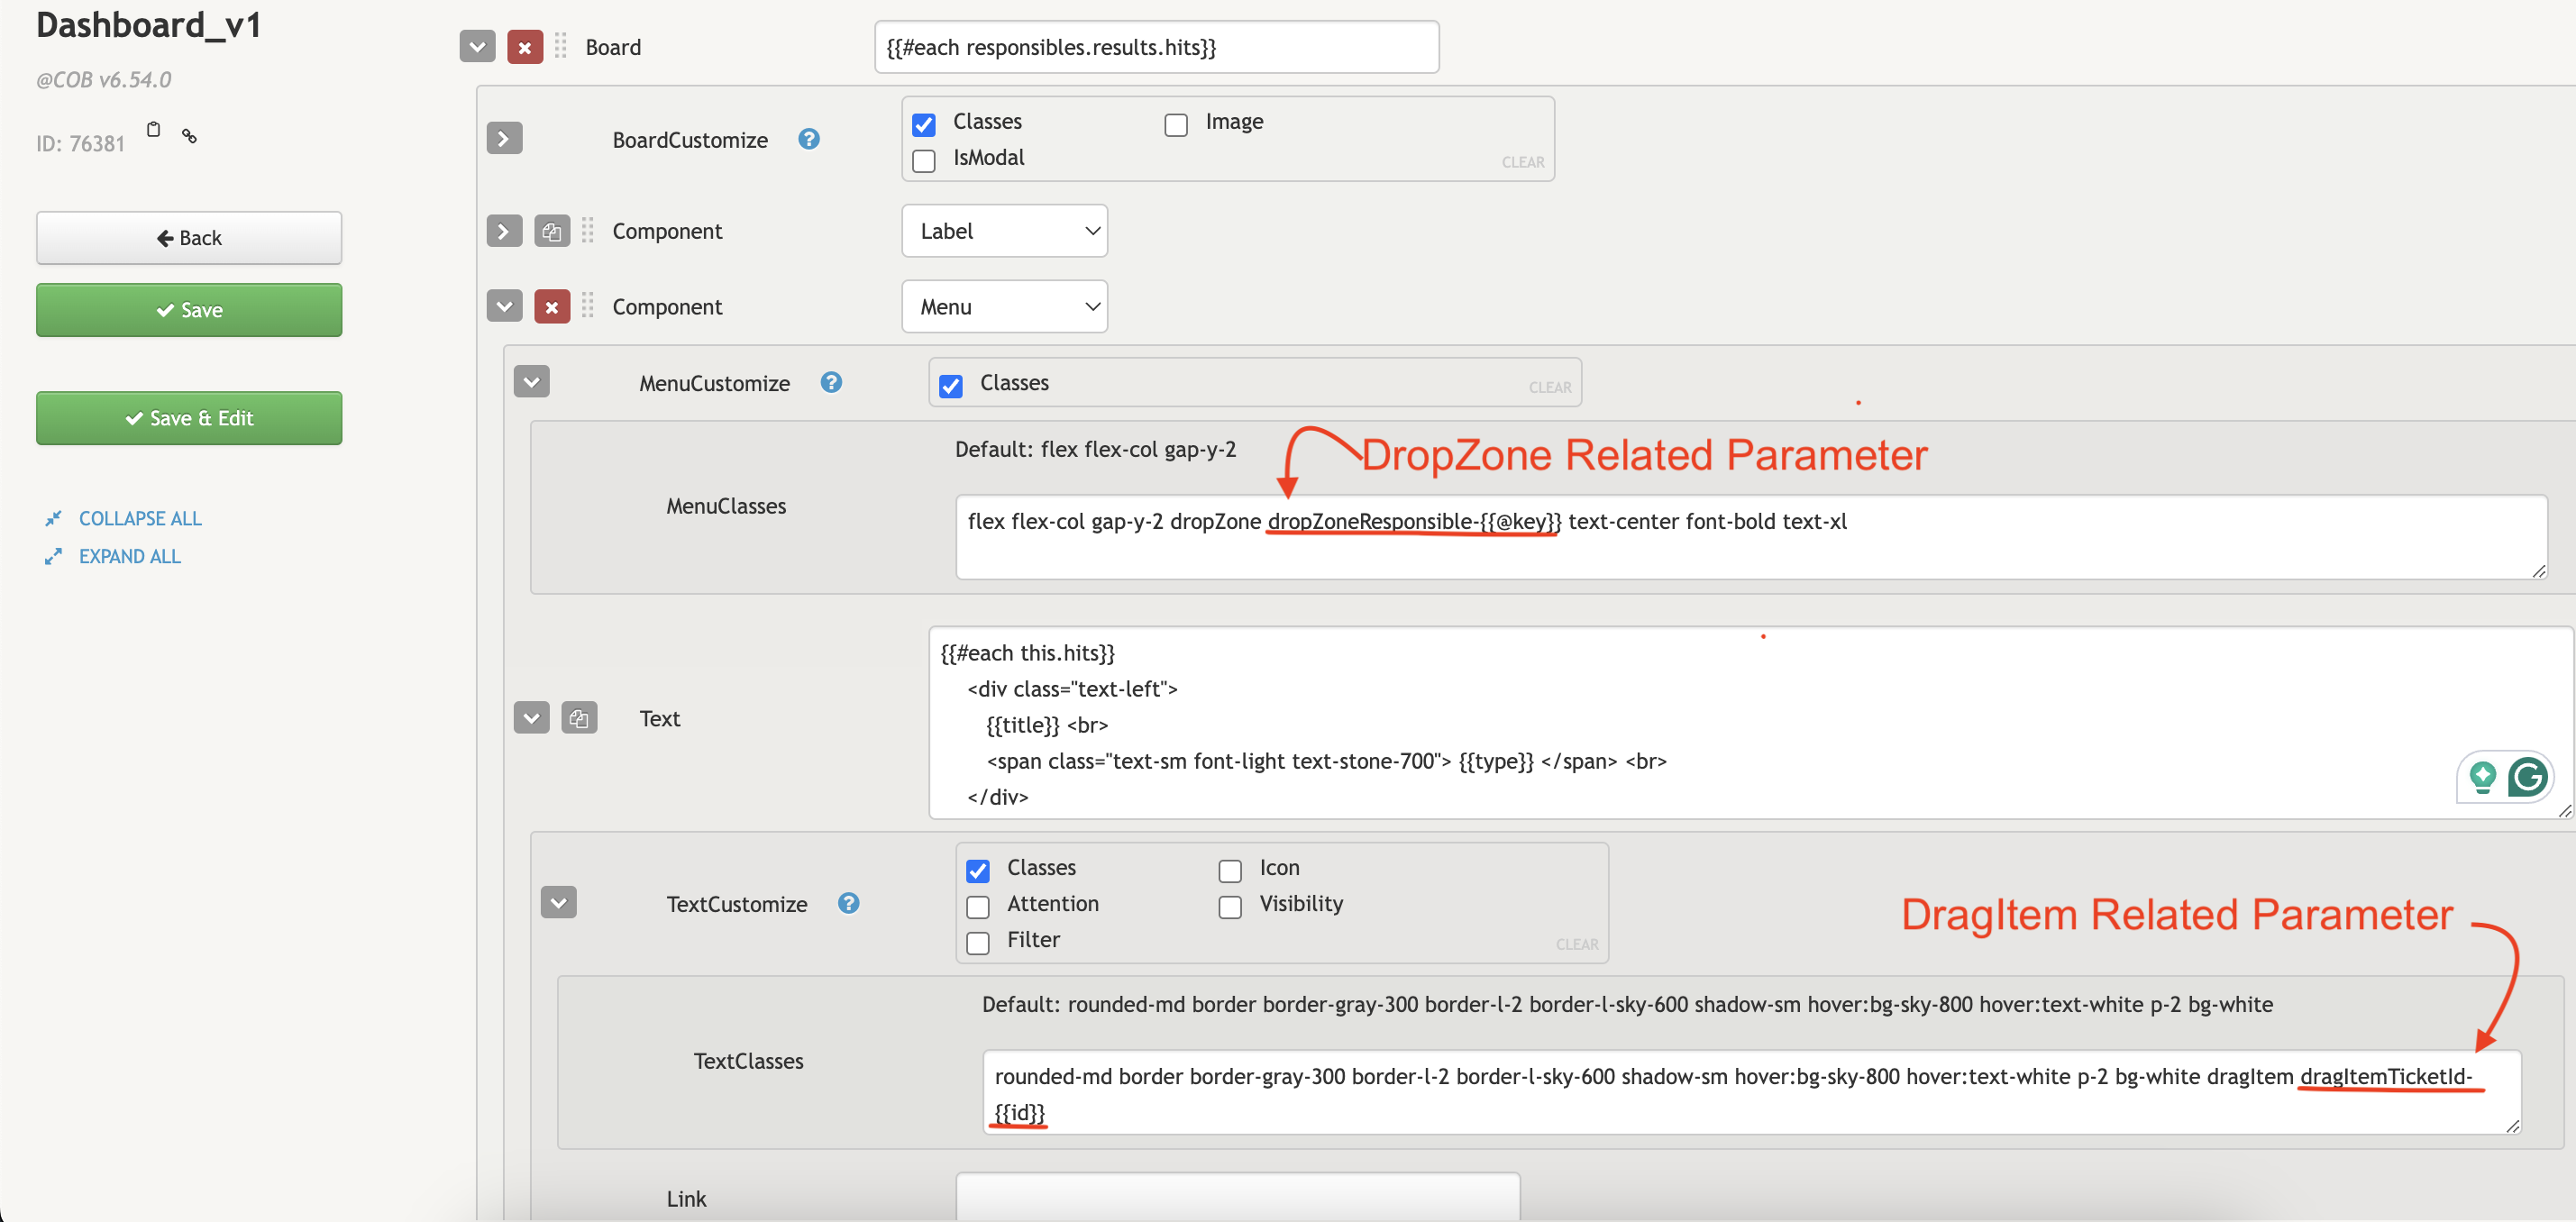
Tickets Example
For the following example, we want to create a simple drag and drop dashboard that lists Tickets and their responsibles. Our final goal is to drag and drop tickets between responsibles to assign them to another user.
To do this, we start by performing a distinct query in our dashboard's context. This way, we get a list of all the responsibles/ticket owners, and their respective tickets:
{
"responsibles" : distinct("Tickets", "responsible_username","*", 100, 0),
}
Then we configure our Menus and respective items (Tickets), having one menu per responsible/ticket owner:

Notice that we configured the drag and drop just like we did for the previous example: setting dropZone in the Menus' classes, and dragItem for each menu item (in the TextClasses).
This results in the following dashboard with menus and draggable Tickets:
Now the only remaining step is to make sure that we update the Ticket instance when we drag a ticket from one responsible/user to another. To do this, we need the ID of the Ticket, and the new Responsible. These are two parameters that we will configure in our dashboard, that will be parsed and sent into a custom concurrent script:
Having the drag and drop ready, we create a simple concurrent script that updates the Ticket instance.
import groovy.transform.Field
@Field static TICKETS_DEF = 'Tickets'

try {
    def ticketId = argsMap.TicketId
    def new_responsible = argsMap.Responsible
    // Since our Responsible field in Tickets is an extRef to UserM, we use the new
    // responsible username to retrieve the User from UserM and use its ID for the ref
    // in the format /userm/user/id
    def new_responsible_id = userm.getUser(new_responsible).getBody().id
    def updates = ["Responsible": "/userm/user/${new_responsible_id}"]
    recordm.update(TICKETS_DEF, ticketId, updates)
} catch(e) {
    log.info("Error updating ticket: "+e.getMessage())
}
And add the script's name to the DragDropConcurrent field in the Dashboard: